|
Nikon releases the new RAW image processing and adjustment software, Capture NX-D, today February 25, 2014 TOKYO - Nikon Corporation is pleased to announce that Capture NX-D (beta version), software for processing and adjusting RAW images captured with Nikon digital cameras, will be available free of charge beginning February 25, 2014. Capture NX-D is a free software application that will replace the current Capture NX 2 application. RAW images (with the NEF or NRW file extension) captured with Nikon digital SLR cameras, Nikon 1 advanced cameras with interchangeable lenses, and Nikon COOLPIX compact digital cameras can be loaded into the application for high-quality photofinishing through the processing and adjustment of images.
In addition to RAW images, the application can also be used to adjust JPEG and TIFF files. 'D' comes from the word, 'Development' for software that offers adjustment functions specializing in RAW development. During the period that Capture NX-D (beta version) is available, we will collect requests and ideas regarding the application from those using it on our website. We will then use those requests and ideas to improve the application prior to its official release scheduled for this summer.
We will continue to update and provide support for the current Capture NX 2 application while the beta version of Capture NX-D is available. However, once the official version of Capture NX-D is released, we will no longer support Capture NX 2 with updates. Overview Product name Capture NX-D (beta version) Release date February 25, 2014 URL http://beta.nikonimglib.com/. Development Background To date, Nikon has supported the processing and adjustment of RAW images captured with Nikon digital cameras, for high-quality photofinishing, with its Capture NX series of software applications (sold separately). Though the ViewNX series of image browsing and editing software bundled with Nikon cameras also offers some functions for adjusting RAW images, many users have demanded more advanced RAW image adjustment functions. Therefore, we have developed a new software application that allows users to enjoy the same RAW image processing and adjustment capabilities available with the Capture NX series, and will be available free of charge. Capture NX-D is a software application developed with Nikon's particular imaging concept, enabling high-quality photofinishing through the adjustment of images after they are captured.Can be downloaded from our website.
Primary Features 1. Adjustment functions specialized for RAW processing, just as they were with the Capture NX series The application includes functions for adjusting aspects of RAW images captured with a Nikon digital camera (NEF or NRW file extension) that can be adjusted even after images are captured, including white balance and exposure compensation. Smooth adjustment of images is possible immediately after they are transferred to computers. Picture Control, Nikon's exclusive function for specifying imaging characteristics, is also supported. Support for simple adjustment of JPEG and TIFF images In addition to processing and adjustment of RAW images, the application offers the same functions available with Capture NX 2 for adjustment aspects such as tone curves, brightness, and contrast, as well as functions for correcting lateral color aberration caused by lenses, in JPEG and TIFF images.

Floating palettes that are easy to use with multiple screens When two or more monitors are used, the image display area can be expanded by moving individual floating palettes for each adjustment function. Convenience has been increased with the ability to combine two or more floating palettes, which can then be moved together.
A variety of displays, including comparisons of multiple images and adjustment before-and-after images Display of the application window can be adjusted for greater convenience. Thumbnail display, filmstrip display, single-image display, and full-screen display are possible. When filmstrip display is selected, thumbnails can be positioned at the top, bottom, left, or right of the image area. In addition, displays for comparing images, whether multiple image files, or a comparison of a single image before and after adjustments are applied, are available. When comparing images, enlargement of a portion of one image automatically enlarges the same portion of the other image, making the application of adjustments with simultaneous viewing of the primary subject simpler. Adoption of a sidecar format that saves original data as non-destructive files Unlike the format previously used to save images to which adjustments have been applied, a sidecar format, which saves adjustment data as a separate file, has been adopted. Saving original data as non-destructive files allows users to start over with the adjustment of RAW images in their original, post-capture state, without undoing previous adjustments.
Other functions Filtering functions have been built into the application, allowing users to easily find the images they are looking for by filtering them according to criteria such as camera name or lens focal length based on tag data. In addition, batch processing can be used to simplify the troublesome process of applying adjustments to multiple images, and images can be transferred to another application in 16-bit TIFF format after RAW processing. Capture NX-D System Requirements (Beta Version). Windows OS Pre-installed versions of Windows ® 8.1 (64-bit version) or Windows ® 7 Service Pack 1 (Compatible with 64- and 32-bit versions) Runs as a native 64-bit application in 64-bit version Processor Pentium-compatible CPU (Core i5 or better recommended) RAM (memory) 2 GB or more (4 GB or more recommended) Hard-disk space 800 MB or more required for installation (2 GB or more recommended) Screen resolution 1280 x 768 pixels or more Other As the beta version is available only via download, an Internet connection is required. Macintosh OS OS X version 10.8 and 10.9 Processor Intel ® Core™ 2 Duo or better CPU (Core i5 or better recommended) RAM (memory) 4 GB or more Hard-disk space 800 MB or more required for installation (2 GB or more recommended) Screen resolution 1280 x 768 pixels or more Other As the beta version is available only via download, an Internet connection is required.Specifications for the official release version of the application will be announced as they are finalized.Macintosh is trademarks of Apple Inc., registered in the U.S. And other countries.Windows is either registered trademark or trademark of Microsoft Corporation in the United States and/or other countries.Products, brand names and service names are trademarks or registered trademarks of their respective companies.
Tethered shooting is connecting a computer to the camera when you shoot so the pictures you take a downloaded to the computer rather than (or in addition) to a memory card. Usually, the camera and computer are connected by cable, hence tethering. In this tutorial, I am going to go over tethered shooting, why (or when) you should shoot tethered, how it is done and what is the gear involved. Why Tether Shoot You would probably wanna shoot tethered for the speed at which you ca n get the files onto a computer.
Why would you want to do that? I can think of at least several reasons: The first of which is quickly watching the raw photographs on the computer. This means that you, the photographer, are not the only person on set and have a supervising art director, client, or other stake holders, you don’t need to interrupt the session to download images into a computer or get a huddle-up behind your back to watch your LCD.
They can watch the images immediately on a big comfortable screen. This also allows you to perform quick or verifications on the photographs you shoot (focus, exposure and so on). Sometimes this can really ease up your workflow. For example when you are doing a composite shoot, you can stack the images and make sure everything is properly placed and ready for editing. Lastly, this means that your files can be auto backed-up while you shoot. You have at least one level of redundancy (memory card + computer), but you can also use a raid, a portable drive or any other configuration that makes you feel good about file safety. Set Up & Workflow My tethered setup usually includes two tripods, one holds the camera and the other holds a laptop table.
If conditions allow, I try and hook up the laptop to a power outlet. This is not necessary, but for prolonged shooting it is one less thing to worry about. Then there is the cable that connects the camera to the computer.
This is a USB cable. I have seen another photographers secure the cable to the tripods or laptop, but I just leave it free. If anyone bumps into one of the tripods (which should not happen anyways) I’d rather loose connectivity than having the camera or laptop getting knocked over, so I just plug the USB into the camera and computer. If you want to make sure the cable does not put any strain on the USB port, Tethertools sells a small buckle called. It does what it’s names for.
It stops the cable from pulling on the socket. A similar effect can be achieved with a which is way cheaper. Once everything is setup and depending on the software you would need to “connect” to the camera. Some programs offer auto connect, while in others it is a manual process. If you camera and software combo supports live view, this is when you’ll start seeing the feed on your laptop.
Once everything is good to go. You can trigger the camera either via the shutter button or via the tethering program.
Cinterion (ex-Siemens) Modem features. GSM/GPRS functions supported: Siemens data/fax transmission/reception; SMS transmission/reception; voice calls; GSM dual band (900/1800 MHz); GPRS class 8. Suitable for any kind of automation, M2M, remote control, telemetry, environmental monitoring, security, automotive. Download SMS and MMS messaging software for Cinterion MC35i GSM dual band Terminal, Download Software SDK to send and receive SMS and MMS messages. The toolkit ships with samples for Visual Basic.NET, CSharp.NET, ASp.NET, Delphi, PHP and more. Nov 17, 2008 - THE USE OF THE PRODUCT INCLUDING THE SOFTWARE AND DOCUMENTATION (THE 'PRODUCT') IS. Microsoft and Windows are either registered trademarks or trademarks of Microsoft Corporation in the United. This document describes the hardware of the Cinterion MC35i Terminal. Cinterion mc35i driver windows 7.
Once you take a photo, it takes about 3-10 seconds to transfer to the computer, depending on the image-size settings, the connection speed, and the computer’s computation power. On some programs you can take another photo as soon as you want, and on some you have to wait for the image to transfer first. Some, like Lightroom, you can go as fast as you want with the shutter button, but have to wait for the complete download if you use Lightroom for triggering. Gear If you have GAS (Gear Acquisition Syndrome), tethered shooting opens up a whole new path for you to spend money. Starting from software, through tripods, laptop tables and dedicated stands, a computer and a whole bunch of cables, remotes, grips and accessories. I am going to go over a basic setup, but it can get wild pretty quick.
Camera Not all camera were created even. Some cameras will support some features and some will support others, and some will support some features with one type of software and another set of features with another software.
Make sure to check the compatibility of your specific camera on the software site. Almost any modern DSLR (and some point and shoots and EVILs) supports tethered shooting, although some provide more functionality than others. Here is a list of features that sets the cameras apart.
 Nikon Coolpix Hack
Tethered Live View – Live view is the ability to see through your camera’s lens. Almost any Video supporting camera will have live view (which is how you shoot video if you don’t use a dedicated monitor), but not all camera are capable of feeding that live view to a tethered computer. Simultaneous Card/Camera save – Can the camera save a picture to the computer AND a memory card simultaneously? Or does a tethered computer overrides any memory card?. USB Cable – most cameras will use a mini or micro standard USB cable,but Nikon uses a. It is not an expensive cable, but it is proprietary so it is a hustle to go and get one if you lose yours.
(So save that cable that you got with your camera). Connectivity – How does the camera connects with the computer? The most common way is USB, but the for example can connect via an Ethernet port or Wi-Fi.

Laptop Connectivity: probably the first thing you wanna make sure is that the computer has a USB 2 or higher interface (assuming you are using a relatively modern camera). All the benefits of tethered shooting go down the drain if you have to wait 5 minutes between shots.
Hardware: any modern desktop/laptop should be able to carry a tethering software. I have even used Breezesys software on an old Asus HE netbook and was quite happy. Monitor: This is basically one of the mail reasons you are shooting tethered, right?
You want to see the pictures on the big monitor. The rules are simple, the bigger and higher resolution the monitor is, the more details you will see. But even a 10″ laptop is a better alternative than the camera’s tiny LCD.
Another thing you wanna be aware of when selecting a monitor, and particularly a laptop, is glare. How easy it will it be using it outside. Can it be viewed in sunlight? If not will you? Tripod / table / station: If you own a big studio, there is a good chance you have a tethering station already setup. If you are doing things on a smaller scale, you’ll probably want a small table to rest the tripod on, along with a second tripod for that table.
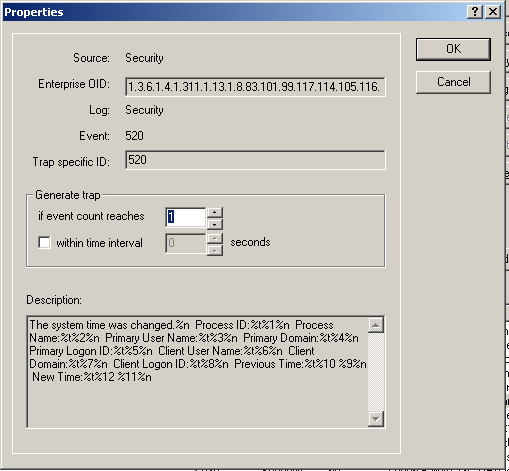
All necessary Windows 2008 SNMP service settings were made successfully. Then when i start 'evntwin' and try to make custom settings, i don'e see event with such ID in events lists but only with old IDs and if i add these (old) events nothing events transfered to destination. Using 'evntcmd' command with new event IDs don't bring success.
I personally use the gear from (including a blazing red as a second tripod). The system has all the stuff that a tethered photographer needs – a non slip table, a non slip mouse pad and a cup holder. Both the cup holder and the mouse pad are optional, but I warmly recommend using a mouse pad when you shoot.
It is so much easier than fiddling with the small touch pad. Software Software is what drives this entire process. Without it your computer is just connected to a very expensive USB Drive.
Here is a comparison of the more common software, I have personally used only 3 of those, so it is spec based Software third Party? Camera Live View control settings Wifi OS (W/L/M) Buy Cost X C V V X W,M x 0 X N V V V W, M $180 V C,N X X X W,M $119 V C,N V V V W,M $299 V C,N X X X M $79 V N V V? W $29.95 V N,C V V V W $24.95 V N V V V M x 0 V C,N V V V W,M (p) $175 V C,N x V x L X 0 V C,N x V x L X 0 V C,N V V V iOS $299 V N V V? W X 0 Workflow The workflow really depends on what you are using for software (I usually use Lightroom 4) but the basic steps are always similar. Here is a short walk through on how it works in LR and a few slightly random tips.
First thing is plugging the camera into the computer and letting Lightroom identify the camera. You can than select the setting for the capture session. Once it is set, you can start taking pictures. If you are using a different program, you can still have Lightroom auto import the images into the catalog, using something called “Watch Folder”. A watch folder is a folder that Lightroom keeps an eye on and takes action whenever a file is placed in that folder. So if you are using a different program for tethering, you can still automatically import to a Lightroom catalog if the watch folder matches the other program folder.
Conclusion This is it folks. As you can see it is a pretty easy setup, and once you have a camera, (possibly free) software and a laptop you are good to go. Hello people greetings from Spain.
I am looking for basic technical advices on the choice of both camera and software for tethered shooting (TS). Most of what I can read is oriented towards classical photography for which (no offense) I have very little interest.
My needs are focused on unusual applications for TS for scientific purposes. I have been using PSRemote software coupled to a Cannon A85 camera in order to pick up signal from a very faint source of light placed in a black box. For a few applications, this setting is sufficient to make my point but, when the light source is really faint, I am limited by the maximum 15-second exposure offered by my system (soft+camera).
I am now thinking that maybe it is time to invest a bit more money and find a better camera that will proove more robust than compact cameras and (more importantly) that will give me far more exposure time. I liked PSR very much for its ease of use during this initial phase but I could as well adapt to a new environment as long as my prerequisits are fulfilled. I do not need anything fancy or sophisticated, just something reliable, affordable, easy to use and robust many thanks in advance for your advices. Talk to you sooncheersJPG. I found a way to connect o digicam, but my cord is literally two feet long, which is a problem.
I’m using the cord, i think, that came with my D750. It doesn’t connect to the top mouse labeled plugin, but the bottom hdmi port with a smaller size end, not an hdmi size. I’ve looked through everything. What cord do I need and how big/long do they make them. I’d rather use wifi, what the D750 advertized quite a bit. But there’s not too much info under help or on the web. Mainly just connecting to devices (via app) that are about the same size of my camera screen (like my phone.
And don’t worry about the perfect grammer, as long as you help I have no problem, especially knowing it’s your second language.
Comments are closed.
|
AuthorWrite something about yourself. No need to be fancy, just an overview. ArchivesCategories |
- Blog
- Comodo Internet Security Pro 8 Serial Key
- Academy 1/350 Scale Admiral Graf Spee Premium Edition Kit
- Download Software Penjualan Tiket
- Firestorm Ieee 1394a Pci Adapter Driver
- House Of Cards Season 2 Torrent Download Tpb
- Manual Honda Xr 400 Espanol
- Butel Software Keygen
- 1 2 All Email Nulled Scripts
- L5r 3rd Edition Character Creation
- Orchestra Baobab Made In Dakar Rar Files
- Drivers Gemini First Mix Driver
- Crack De Roxio Easy Media Creator 9 Activation
 RSS Feed
